Difference between revisions of "Website News and Media Guidelines"
(→Add News Bulletin) |
Marc.maier (talk | contribs) |
||
| (50 intermediate revisions by 4 users not shown) | |||
| Line 1: | Line 1: | ||
| − | News Items appear on the Home page as a title with, underneath, a maximum of 50 | + | News Items appear on the Home page as a title with, underneath, a maximum of 50 characters to describe the main message. When you click on the title line, the full news item is displayed. The item is also accessible from other parts of the menu structure. In order to create a news item, you have to log in to the back end (though you can edit them from the front end). |
| − | News items can be a '''Noticesheet, Newsletter, News Bulletin | + | News items can be a '''Noticesheet, Newsletter, News Bulletin''' or '''Sermon Download'''. |
| + | == Add Notice Sheet (Updated for 3.0) == | ||
| + | <div class="warning">If you are using Internet Explorer 9, please make sure that the [http://windows.microsoft.com/is-IS/windows7/How-to-use-Compatibility-View-in-Internet-Explorer-9 Compatibility View] is disabled.</div> | ||
| + | To add a '''Notice Sheet''': | ||
| + | #First make sure the Notice Sheet is saved somewhere on the PC on which you're working in PDF format. | ||
| + | #Log in to the back end of the website. [https://www.christchurchchislehurst.org/administrator/index.php https://www.christchurchchislehurst.org/administrator/index.php] | ||
| + | #Select ''Content>Article Manager>Add New Article'' | ||
| + | #Under ''Title'', write the date of the Notice Sheet, in standard format eg ''13 September 2015''. | ||
| + | #In the Category box select ''---Notice Sheets'' | ||
| + | #In the ''Tag'' box, select ''All news and media/All notice sheets''. | ||
| + | #In the white area under ''Article text'', remove the default text and enter either what you think is the theme of the Sunday or summarises the most important announcements, e.g. ''SIXPM starting again, Emotionally Health Spirituality course info ...'' (no more than 70 characters). | ||
| + | # Remove the default text under the separator.<br/>[[File:Enter-notice-sheet-info.png]] | ||
| + | # SAVE the article | ||
| + | #To upload the PDF file: | ||
| + | ##Go back into the article | ||
| + | ##Go to the ''PDF'' tab and click on Select next to the ''PDF file'' field. '''If you can't see the 'PDF' tab, click 'Save' and it should appear.'''<br/>[[File:Go-to-notice-sheet-tab.png]] | ||
| + | ##Navigate to ''/noticesheets/2015'' or whatever year it is, in the ''Upload file'' section, click ''Choose File'', locate the audio file and select ''OK'' (or ''Open'') then click ''Start Upload''. | ||
| + | ##After the file has been uploaded, you need to locate it in the folder, select it and then click on ''Insert''.<br/>[[File:Upload-notice-sheet.png]] | ||
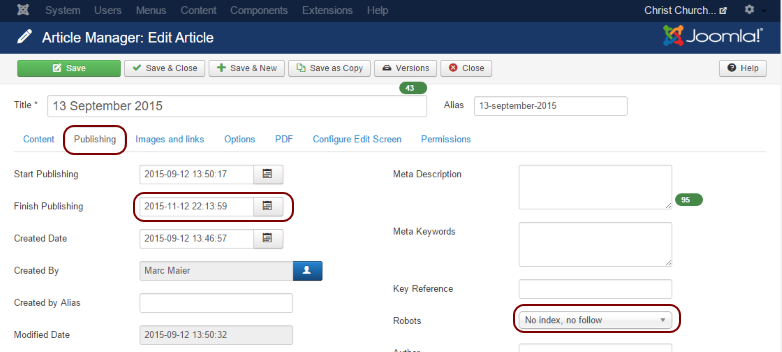
| + | #In the ''Publishing'' section: | ||
| + | ##Enter a date '''two months''' hence in the ''Finish Publishing'' box. Note: it may drop off the Home page before this date, depending on the number of items in the box. But it will be available under the Resources menu drop down until the ''Finish Publication'' date. | ||
| + | ##<div class="warning">Please set ''Robot field'' to ''No index, no follow'' to make sure that search engines will not index the notice sheet.</div><br/>[[File:Enter-notice-sheet-publishing-info.png]] | ||
| + | #Press ''Save&Close''. | ||
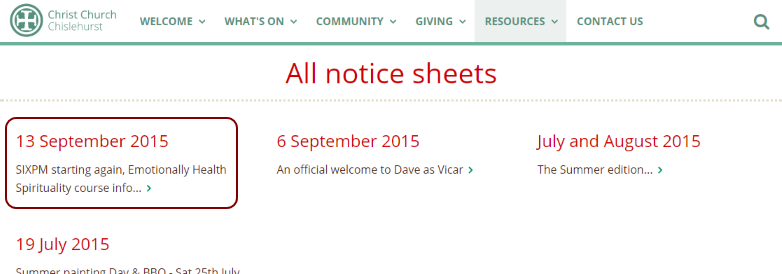
| + | <div class="warning">Verify that the notice sheet appears correctly.</div> | ||
| + | # Go to the [https://www.christchurchchislehurst.org/noticesheets website in the Notice Sheets section]. | ||
| + | # Click on the notice sheet and make sure that you can both view and download the notice sheet.<br/>[[File:Check-notice-sheets-page.png]] | ||
| − | == Add | + | == Add Newsletter (updated for 3.0) == |
| − | |||
| − | |||
| − | |||
| − | |||
| − | |||
| − | |||
| − | |||
| − | |||
| − | |||
| − | |||
| − | |||
| − | |||
| − | |||
| − | |||
| − | |||
| − | |||
| − | |||
| − | |||
| − | |||
To add a '''Newsletter''' | To add a '''Newsletter''' | ||
#<div class="warning">If you are using Internet Explorer 9, please make sure that the [http://windows.microsoft.com/is-IS/windows7/How-to-use-Compatibility-View-in-Internet-Explorer-9 Compatibility View] is disabled.</div> | #<div class="warning">If you are using Internet Explorer 9, please make sure that the [http://windows.microsoft.com/is-IS/windows7/How-to-use-Compatibility-View-in-Internet-Explorer-9 Compatibility View] is disabled.</div> | ||
#First make sure the Newsletter is saved somewhere on the PC on which you're working. | #First make sure the Newsletter is saved somewhere on the PC on which you're working. | ||
| − | #Log in to the [http://www.christchurchchislehurst. | + | #Log in to the [http://www.christchurchchislehurst.org/administrator/index.php back end of the website]. |
#Select 'Content>Article Manager>Add New Article' | #Select 'Content>Article Manager>Add New Article' | ||
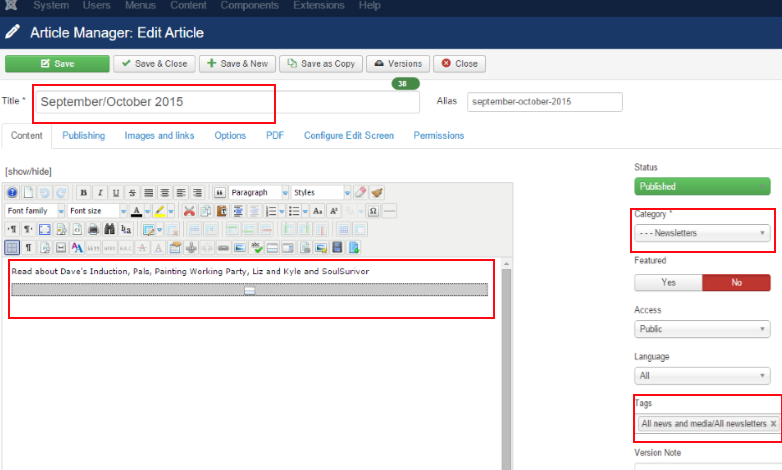
| − | #Under ''Title'', write the date of the Newsletter, in standard format eg ''November | + | #Under ''Title'', write the date of the Newsletter, in standard format eg ''November 2015''. |
| − | #In the Category box select ''-Newsletters'' | + | #In the Category box select ''---Newsletters'' |
| − | #In the white area under ''Article text'' | + | #In the ''Tag'' box, select ''All news and media/All Newsletters''. |
| − | # | + | #In the white area under ''Article text'', remove the default text and enter either what you think are the themes of the Newsletter, eg ''Read about Dave's induction ...'' (no more than 70 characters). |
| − | + | # Remove the default text under the separator.<br/>[[File:Enter-newsletter-info.png]] | |
| − | # | + | # SAVE the article |
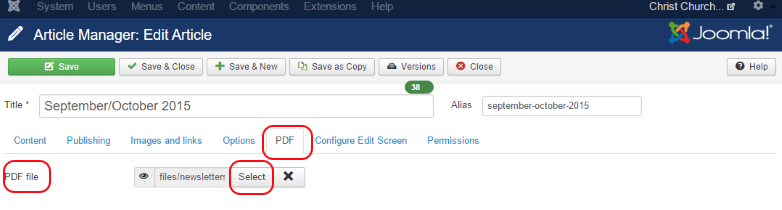
| − | + | #To upload the PDF file: | |
| − | + | ##Go back into the article | |
| − | # | + | ##Go to the ''PDF'' tab and click on Select next to the ''PDF file'' field. '''If you can't see the 'PDF' tab, click 'Save' and it should appear.'''<br/>[[File:Upload-newsletter.png]] |
| − | # | + | ##Navigate to ''/noticesheets/2015'' or whatever year it is, in the ''Upload file'' section, click ''Choose File'', locate the audio file and select ''OK'' (or ''Open'') then click ''Start Upload''. |
| − | #<div class="warning">Please set '' | + | ##After the file has been uploaded, you need to locate it in the folder, select it and then click on ''Insert''.<br/>[[File:Go-to-newsletter-tab.png]] |
| − | #Press ''Save&Close'' | + | #In the ''Publishing'' section: |
| + | ##Enter a date '''one year''' hence in the ''Finish Publishing'' box. Note: it will drop off the Home page well before this date, but it will be available under the Resources menu drop down until the ''Finish Publication'' date. | ||
| + | ##<div class="warning">Please set ''Robot field'' to ''No index, no follow'' to make sure that search engines will not index the notice sheet.</div><br/>[[File:Enter-newsletter-publishing-info.png]] | ||
| + | #Press ''Save&Close''. | ||
| + | <div class="warning">Verify that the notice sheet appears correctly.</div> | ||
| + | # Go to the [https://www.christchurchchislehurst.org/newsletter website in the Newsletter section]. | ||
| + | # Click on the notice sheet and make sure that you can both view and download the notice sheet.<br/>[[File:Check-newsletter-page.png]] | ||
| + | ' | ||
| Line 57: | Line 69: | ||
#Press 'Save&Close' | #Press 'Save&Close' | ||
| − | |||
| − | |||
| − | + | == Add Sermon Download (Updated for 3.0) == | |
| − | + | <div class="warning">If you are using Internet Explorer 9, please make sure that the [http://windows.microsoft.com/is-IS/windows7/How-to-use-Compatibility-View-in-Internet-Explorer-9 Compatibility View] is disabled.</div> | |
| − | + | To add a '''Sermon Download''': | |
| − | + | #First make sure the Sermon file is saved somewhere on the PC on which you're working. | |
| − | + | #Log in to the back end of the website. [https://www.christchurchchislehurst.com/new/administrator/index.php https://www.christchurchchislehurst.com/new/administrator/index.php] | |
| − | + | #Select ''Content>Article Manager>Add New Article''. | |
| − | + | #Under ''Title'', write the title of the sermon, e.g. ''Vision & Giving''. Occasionally you may not have a title in advance (e.g. a visiting speaker), so create the title by listening to the first few minutes of the sermon during which he/she should say what he/she's going to talk about! | |
| − | + | #In the ''Category'' box select ''---Sermon Downloads''. | |
| − | + | #In the ''Tag'' box, type ''down'' and select ''All news and media/All sermon downloads''. | |
| − | + | #In the white area under ''Article text'' above the separator, remove the default text and first enter the name of the speaker, then | and then date, e.g. ''Dave Johnston | 30 August 2015''. | |
| − | + | #Below the separator, remove the default text and first enter the name of the speaker, then |, date, |, reading, e.g. ''Dave Johnston | 30 August 2015 | Reading: Matthew 20:1-16''.<br/>[[File:Enter-audio-info.png]] | |
| − | + | #If it is one of the regular Christ Church speakers, he/she will have their contact detail on the website, so instead of typing the name, click the ''Link'' button (a popup dialog should appear). Select the contact in the Link Browers (this will update the 'URL' field), enter the name in the ''Text'' field and select ''Insert''. This will post the name as a clickable link to their photo and contact details.<br/>[[File:Create-speaker-link.png]] | |
| − | + | #If you feel like going the extra mile, you can link the reading to the corresponding passage on the [https://www.biblegateway.com/versions/Message-MSG-Bible/ Bible Gateway]. | |
| − | To add a '''Sermon Download''' | + | #To upload the audio file: |
| − | #First make sure the Sermon file is saved somewhere on the PC on which you're working. | + | ##Go to the ''Audio'' tab and click on Select next to the ''Audio recording file'' field. '''If you can't see the ''Audio'' tab, click ''Save'' and it should appear.'''<br/>[[File:Go-to-audio-tab.png]] |
| − | #Log in to the back end of the website. | + | ##Navigate to ''/sermons/2015'' or whatever year it is, in the ''Upload file'' section, click ''Choose File'', locate the audio file and select ''OK'' (or 'Open') then click ''Start Upload''. |
| − | #Select 'Content>Article Manager>Add New Article'. | + | ##After the file has been uploaded, you need to locate it in the folder, select it and then click on ''Insert''.<br/>[[File:Upload-audio.png]] |
| − | #Under 'Title', write the title of the sermon, e.g. 'Vision & Giving'. | + | #In the ''Publishing Options'' section: |
| − | #In the Category box select '-Sermon Downloads'. | + | ##Enter a date '''one year''' hence in the ''Finish Publishing'' box. |
| − | #In the white area under 'Article text' first enter the name of the speaker. If it is one of the regular Christ Church | + | ##In the ''Meta Description'', copy the text entered in the ''Article text'' section and prefix it with ''Sermon recording'', e.g. ''Sermon recording: Dave Johnston | 30 August 2015 | Reading: Matthew 20:1-16''.<br/>[[File:Enter-audio-publishing-info.png]] |
| − | # | + | #Press ''Save&Close''. |
| − | #Go to the | + | <div class="warning">Verify that the sermon appears correctly.</div> |
| − | # | + | # Go to the [https://www.christchurchchislehurst.org/sermon-downloads website in the Sermon Downloads section]. |
| − | + | # Click on the recording and make sure that you can both play back and download the recording.<br/>[[File:Check-audio-age.png]] | |
| − | # | ||
| − | # Enter ' | ||
| − | # | ||
| − | |||
| − | # | ||
| − | |||
Latest revision as of 21:05, 6 October 2015
News Items appear on the Home page as a title with, underneath, a maximum of 50 characters to describe the main message. When you click on the title line, the full news item is displayed. The item is also accessible from other parts of the menu structure. In order to create a news item, you have to log in to the back end (though you can edit them from the front end). News items can be a Noticesheet, Newsletter, News Bulletin or Sermon Download.
Contents
Add Notice Sheet (Updated for 3.0)
If you are using Internet Explorer 9, please make sure that the Compatibility View is disabled.
To add a Notice Sheet:
- First make sure the Notice Sheet is saved somewhere on the PC on which you're working in PDF format.
- Log in to the back end of the website. https://www.christchurchchislehurst.org/administrator/index.php
- Select Content>Article Manager>Add New Article
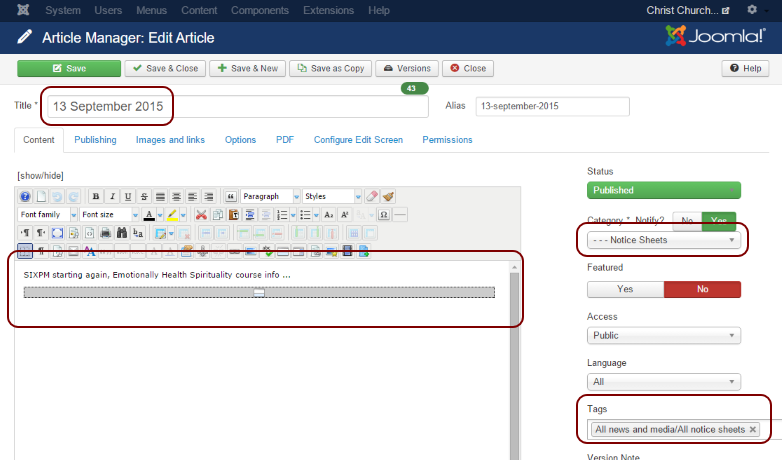
- Under Title, write the date of the Notice Sheet, in standard format eg 13 September 2015.
- In the Category box select ---Notice Sheets
- In the Tag box, select All news and media/All notice sheets.
- In the white area under Article text, remove the default text and enter either what you think is the theme of the Sunday or summarises the most important announcements, e.g. SIXPM starting again, Emotionally Health Spirituality course info ... (no more than 70 characters).
- Remove the default text under the separator.
- SAVE the article
- To upload the PDF file:
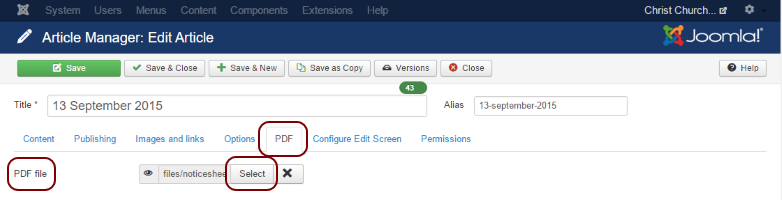
- Go back into the article
- Go to the PDF tab and click on Select next to the PDF file field. If you can't see the 'PDF' tab, click 'Save' and it should appear.
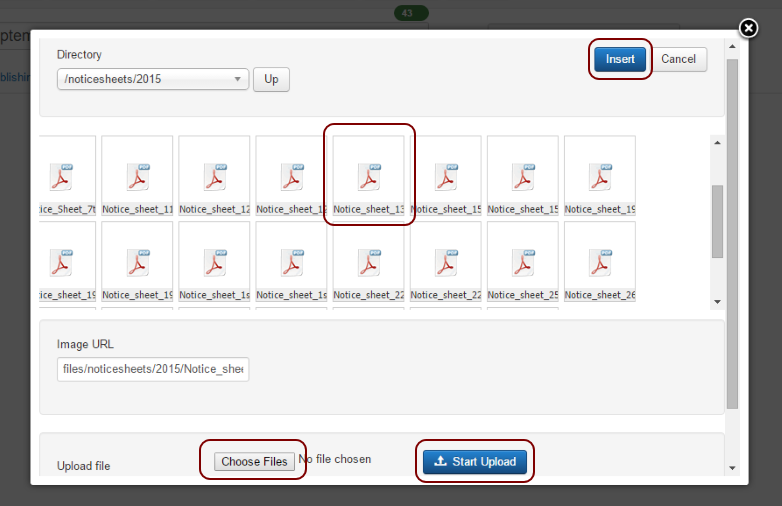
- Navigate to /noticesheets/2015 or whatever year it is, in the Upload file section, click Choose File, locate the audio file and select OK (or Open) then click Start Upload.
- After the file has been uploaded, you need to locate it in the folder, select it and then click on Insert.
- In the Publishing section:
- Enter a date two months hence in the Finish Publishing box. Note: it may drop off the Home page before this date, depending on the number of items in the box. But it will be available under the Resources menu drop down until the Finish Publication date.
- Please set Robot field to No index, no follow to make sure that search engines will not index the notice sheet.
- Press Save&Close.


Verify that the notice sheet appears correctly.
- Go to the website in the Notice Sheets section.
- Click on the notice sheet and make sure that you can both view and download the notice sheet.

Add Newsletter (updated for 3.0)
To add a Newsletter
- If you are using Internet Explorer 9, please make sure that the Compatibility View is disabled.
- First make sure the Newsletter is saved somewhere on the PC on which you're working.
- Log in to the back end of the website.
- Select 'Content>Article Manager>Add New Article'
- Under Title, write the date of the Newsletter, in standard format eg November 2015.
- In the Category box select ---Newsletters
- In the Tag box, select All news and media/All Newsletters.
- In the white area under Article text, remove the default text and enter either what you think are the themes of the Newsletter, eg Read about Dave's induction ... (no more than 70 characters).
- Remove the default text under the separator.
- SAVE the article
- To upload the PDF file:
- Go back into the article
- Go to the PDF tab and click on Select next to the PDF file field. If you can't see the 'PDF' tab, click 'Save' and it should appear.
- Navigate to /noticesheets/2015 or whatever year it is, in the Upload file section, click Choose File, locate the audio file and select OK (or Open) then click Start Upload.
- After the file has been uploaded, you need to locate it in the folder, select it and then click on Insert.

- In the Publishing section:
- Enter a date one year hence in the Finish Publishing box. Note: it will drop off the Home page well before this date, but it will be available under the Resources menu drop down until the Finish Publication date.
- Please set Robot field to No index, no follow to make sure that search engines will not index the notice sheet.
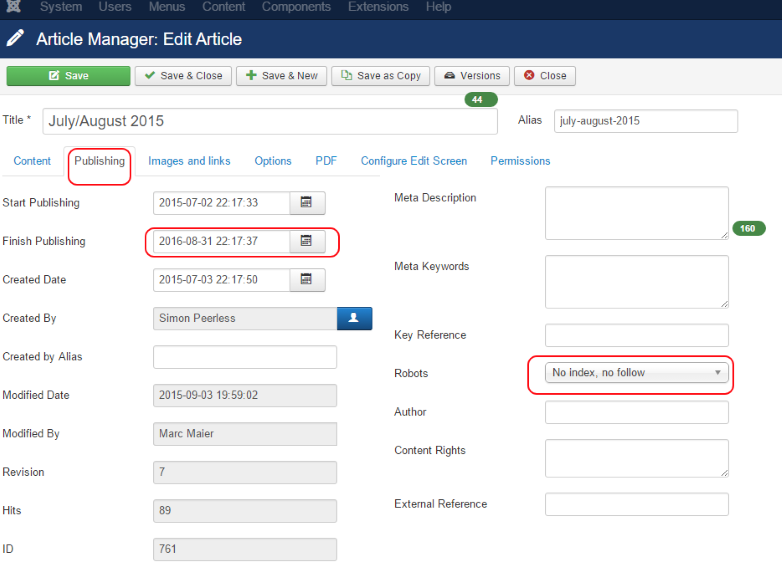
- Press Save&Close.


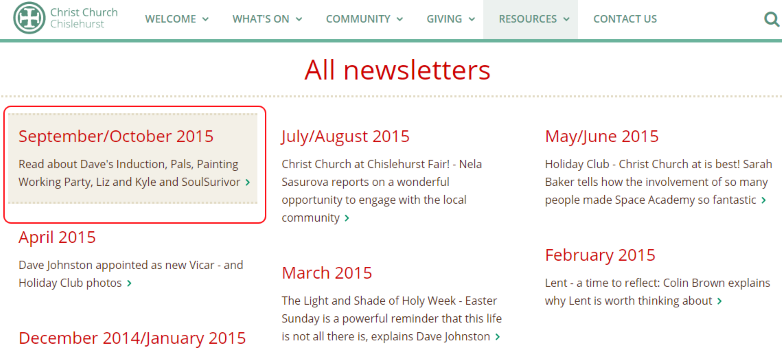
Verify that the notice sheet appears correctly.
- Go to the website in the Newsletter section.
- Click on the notice sheet and make sure that you can both view and download the notice sheet.

'
Add News Bulletin
To add a News Bulletin
- If you are using Internet Explorer 9, please make sure that the Compatibility View is disabled.
- Log in to the back end of the website.
- Select 'Content>Article Manager>Add New Article' or directly to the New Article page.
- Under Title, write the title of the NewsBulletin, e.g. 'Bishop of Rochester to visit Christ Church'. The title will appear on the article page itself and everywhere the article are listed, including in the Recent News section on the home page.

- In the Category box select '-News Bulletins'
- In the white area under 'Article text', above the line, add a summary of no more than 140 characters, e.g. 'Bishop will confirm 25 candidates'. It's meant to wet the appetite of the reader to read more. The summary will appear on where ever articles are listed, including in the Recent News section on the home page:

- Below the line add the full text of the news item. If you want to put a contact name in, click the Link button above (it's shown as a chain link). Click contacts and explore the drop downs till you get the name you want. Type that name in the box above and then click 'insert'. If the name doesn't appear you will have to create the contact (see guidelines for this elsewhere on this Wiki.)
- In the 'Publishing Options' section, click 'Select User' and enter your name.
- Enter today's date in the 'Created Date' and 'Start Publishing' boxes. In the 'Finish Publishing' box enter a date two months hence, unless the News Bulletin is advertising an event in which case the 'Finish Publishing' date should be the date of the event. Note: it may drop off the 'Recent News' box on the Home page before this date, depending on the number of items in the box. But it will be available under the Resources menu drop down until the 'Finish Publication' date.
- Press 'Save&Close'


Add Sermon Download (Updated for 3.0)
If you are using Internet Explorer 9, please make sure that the Compatibility View is disabled.
To add a Sermon Download:
- First make sure the Sermon file is saved somewhere on the PC on which you're working.
- Log in to the back end of the website. https://www.christchurchchislehurst.com/new/administrator/index.php
- Select Content>Article Manager>Add New Article.
- Under Title, write the title of the sermon, e.g. Vision & Giving. Occasionally you may not have a title in advance (e.g. a visiting speaker), so create the title by listening to the first few minutes of the sermon during which he/she should say what he/she's going to talk about!
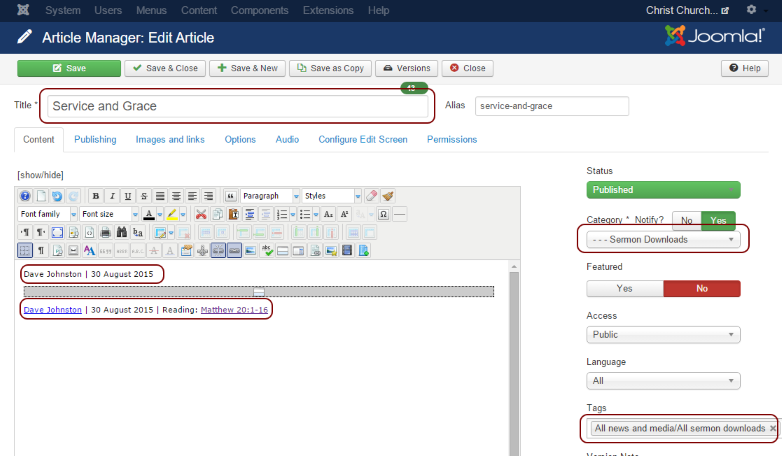
- In the Category box select ---Sermon Downloads.
- In the Tag box, type down and select All news and media/All sermon downloads.
- In the white area under Article text above the separator, remove the default text and first enter the name of the speaker, then | and then date, e.g. Dave Johnston | 30 August 2015.
- Below the separator, remove the default text and first enter the name of the speaker, then |, date, |, reading, e.g. Dave Johnston | 30 August 2015 | Reading: Matthew 20:1-16.
- If it is one of the regular Christ Church speakers, he/she will have their contact detail on the website, so instead of typing the name, click the Link button (a popup dialog should appear). Select the contact in the Link Browers (this will update the 'URL' field), enter the name in the Text field and select Insert. This will post the name as a clickable link to their photo and contact details.

- If you feel like going the extra mile, you can link the reading to the corresponding passage on the Bible Gateway.
- To upload the audio file:
- Go to the Audio tab and click on Select next to the Audio recording file field. If you can't see the Audio tab, click Save and it should appear.
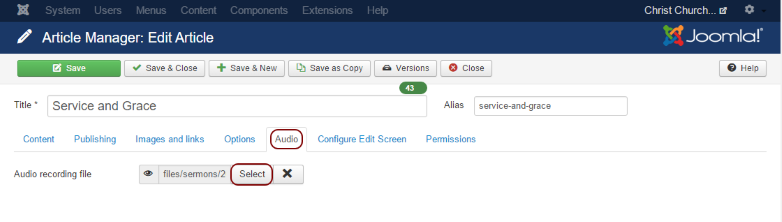
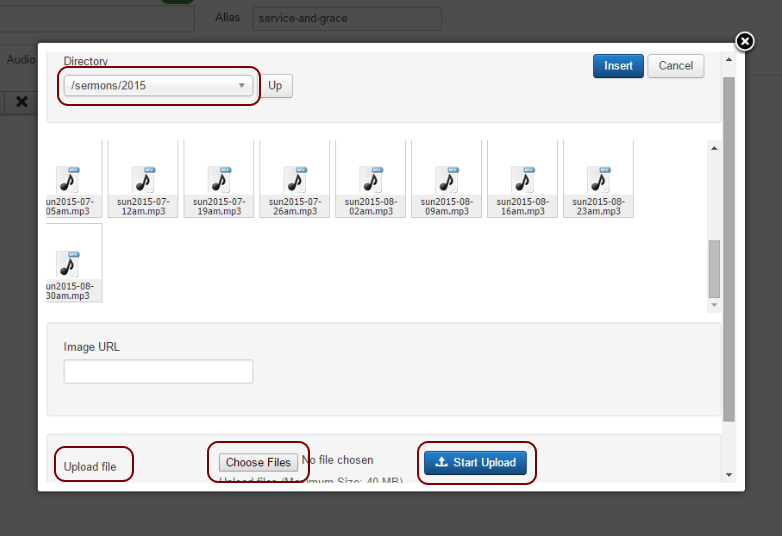
- Navigate to /sermons/2015 or whatever year it is, in the Upload file section, click Choose File, locate the audio file and select OK (or 'Open') then click Start Upload.
- After the file has been uploaded, you need to locate it in the folder, select it and then click on Insert.
- Go to the Audio tab and click on Select next to the Audio recording file field. If you can't see the Audio tab, click Save and it should appear.
- In the Publishing Options section:
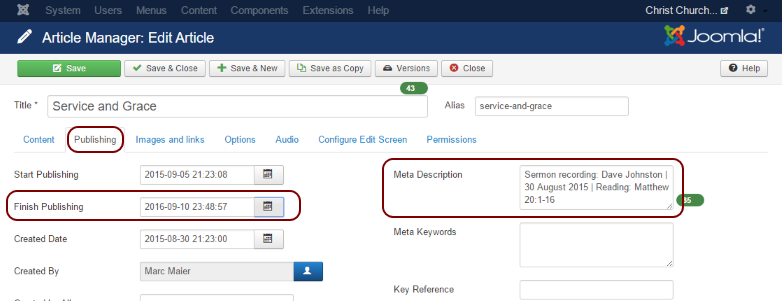
- Enter a date one year hence in the Finish Publishing box.
- In the Meta Description, copy the text entered in the Article text section and prefix it with Sermon recording, e.g. Sermon recording: Dave Johnston | 30 August 2015 | Reading: Matthew 20:1-16.
- Press Save&Close.


Verify that the sermon appears correctly.
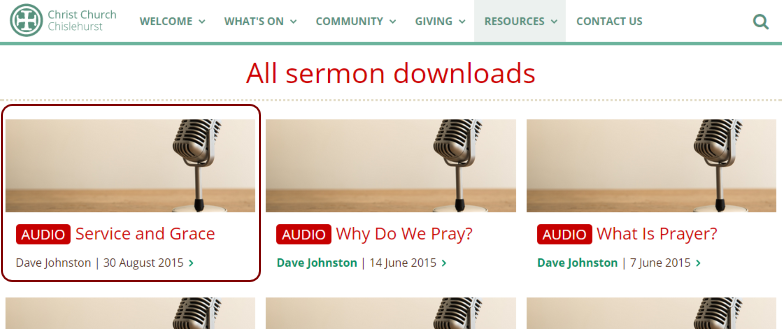
- Go to the website in the Sermon Downloads section.
- Click on the recording and make sure that you can both play back and download the recording.